CNC version 2.0
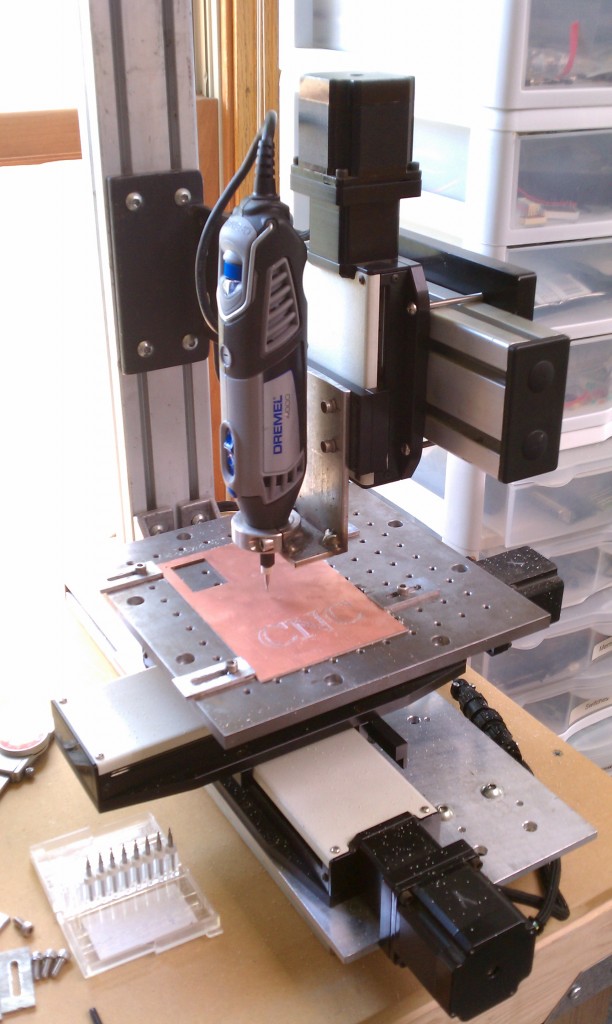
I finally finished putting together my second CNC machine. Again this one is put together with surplus parts, but they are much better surplus parts. I have the luxury of three linear slides from Newmark Systems, that have dual profile rails and recirculating ball slides, along with 16TPI precision screws and recirculating ball guides. In short, the new machine is solid as a rock, and has more torque.

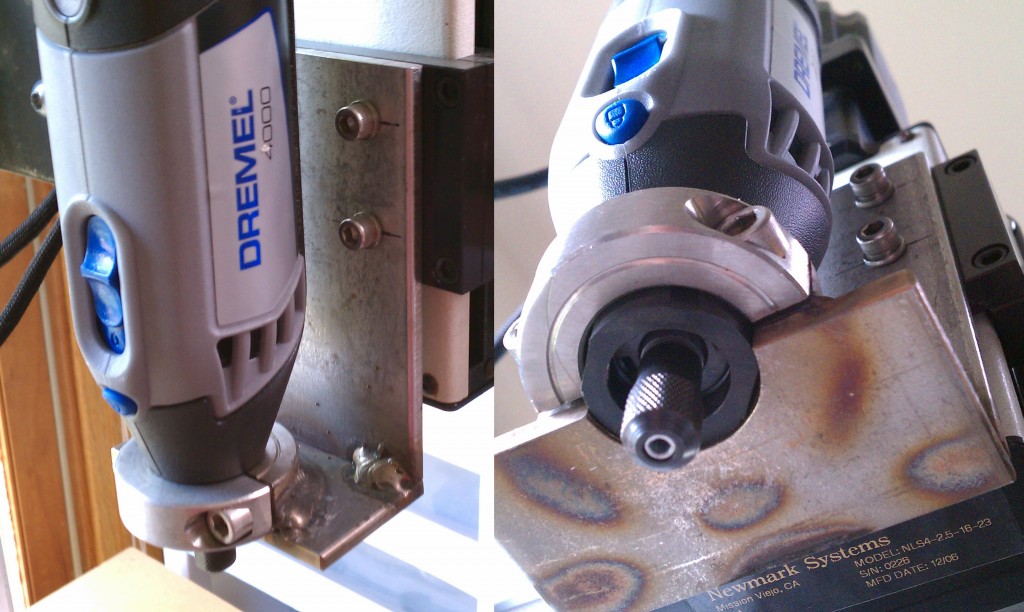
I used a dremel this time instead of a router, since the router was pretty much overkill for engraving anything. I made a mount for the dremel by cutting up the little plastic guide that comes with it. It has an approximate O.D. of 1″ and acts as a nut that you can clamp with a shaft collar, and still unscrew the dremel from the mount if you need to get it out. I welded the shaft collar to a stainless steel bracket.

I haven’t made any boards yet to see if the dremel has much z-axis play.
There’s nothing special about this machine electronics-wise. Since I have NEMA23 steppers and 16TPI lead screws I don’t need a really high voltage drive or anything special. I’m using a 24VDC linear power supply with two automation direct stepper drives and one from Schneider. I didn’t connect the home and limit switches as I don’t think they have much value on machines this small. It’s a lot of work to do proper limit switches that disable the drive and signal the controller that a limit has been reached. Also to have home and limit switches on each axis you need two parallel ports. TurboCNC, being run in DOS, can only use the onboard parallel port so you can’t use PCI parallel port cards with TurboCNC. Only Mach3 can recognize inputs on the extra card since it’s address will map outside of the legacy range.
5 Comments to CNC version 2.0
Leave a Reply
Other Stuff
Recent Posts
- 6CY7 dual triode valve amplifier
- Air quality sensor (TVOC and eqCO2)
- Automotive rear fill “surround sound” with Boss DD-3
- Spring tester / weight scale
- Ducati 749/999 Tail Light
- Instruments for the GSXR
- Light pipe tail light for the GSXR
- M17x 6990m / 6970m overheating
- PAR / Spectrum analyzer
- Acrylic polishing and scratch removal
Archives
- May 2019 (2)
- April 2017 (3)
- October 2015 (1)
- May 2015 (1)
- March 2014 (2)
- December 2013 (1)
- July 2013 (1)
- November 2012 (1)
- October 2012 (4)
- September 2012 (1)
- August 2012 (3)
- June 2012 (1)
- March 2012 (1)
- February 2012 (1)
- January 2012 (1)
- October 2011 (3)
- July 2011 (1)
- June 2011 (3)
- May 2011 (2)
- April 2011 (1)
- December 2010 (1)
- August 2010 (1)
- July 2010 (3)
- April 2010 (2)
- March 2010 (2)
- January 2010 (2)
- December 2009 (2)
- October 2009 (2)
- September 2009 (1)
- August 2009 (15)
I’m not sure whether to be amazed or scared (intimidated) at the stuff you come up with. You are an amazing cat, for sure.
UncaT
Is that video sped up at all? All the DIY CNC builds I see are wicked slow yet yours makes short work of it! Did you follow any specific plans?
Thanks.
That is amazing! If I weren’t happy with the photoresist/etching setup I have already put together, I’d so want to build myself something like this. Look forward to seeing more from you!
Josh,
Great work on the CNC. I don’t know the capabilities for this CNC. Can you do small aluminum, brass, or even maybe steel parts?
I especially want to make some small aluminum parts.
what CAD or Layout Software are you using?
Great Job! Beautiful Machine!
Thanks Jim. Yes, I can do metals. I have machined stainless steel for a leather brand, magnesium for my Alienware laptop, and I have done a few parts in aluminum as well. I use EagleCAD for PCB layouts and PCB2GCODE ULP to export G-code, which I run in TurboCNC. If it’s machining small parts, I use Mach 3.